- Joined
- Nov 3, 2024
- Messages
- 109
- Reaction score
- 1
- Points
- 16
I Supply Demand Zones Indicator for MT4

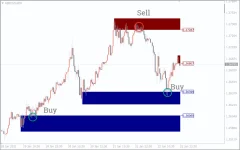
The I Supply Demand Zones Indicator for MT4 simplifies the process of identifying critical supply and demand zones, providing traders with a significant edge in spotting high-probability trading opportunities.
What Are Supply and Demand Zones?
Supply and demand zones are broader areas compared to traditional support and resistance lines. They reflect zones where market participants are likely to engage in significant buying (demand) or selling (supply):- Demand Zone: A price range where buying pressure exceeds selling pressure, causing prices to rise.
- Supply Zone: A price range where selling pressure exceeds buying pressure, causing prices to fall.
How Does the I Supply Demand Zones Indicator Work?
The indicator automatically identifies the best supply and demand zones and displays them directly on the MT4 chart. This eliminates guesswork and allows traders to focus on formulating strategies based on these zones.Features:
- Automatic Zone Identification:
- Highlights both supply zones (resistance) and demand zones (support) clearly on the chart.
- Multi-Timeframe Compatibility:
- Works across all timeframes, allowing traders to align lower timeframe zones with higher timeframe trends.
- Ease of Use:
- Suitable for both beginners and advanced traders.
- Customizable Stops and Targets:
- Many traders place stop losses:
- Below the demand zone for long positions.
- Above the supply zone for short positions.
- Many traders place stop losses:
- Swing Trading Capability:
- Swing traders can hold trades until price reaches the opposite zone.
How to Trade Using the I Supply Demand Zones Indicator
1. Buying in a Demand Zone:
- Look for price action or reversal patterns in the demand zone.
- Enter a BUY position, anticipating an upward movement.
- Place a stop-loss below the demand zone.
2. Selling in a Supply Zone:
- Wait for price action or bearish confirmation within the supply zone.
- Enter a SELL position, anticipating a downward movement.
- Place a stop-loss above the supply zone.
3. Swing Trading:
- Use higher timeframe zones to align trades with the overall trend.
- Hold trades until price approaches the opposite zone for maximum profitability.
Higher Timeframe Supply and Demand Zones
Using supply and demand zones from higher timeframes adds reliability to trades.- Example:
- On an H1 chart, supply and demand zones provide a macro view of the market trend.
- On an M15 chart, the same zones give traders clarity for short-term entries and exits.
Limitations of the Indicator
- Manual Validation Required:
- While the indicator plots zones automatically, traders must manually confirm them using price action or other tools.
- Zone Breaches:
- Supply and demand zones may fail, especially during high volatility or news events.
Conclusion
The I Supply Demand Zones Indicator for MT4 is an indispensable tool for traders looking to capitalize on supply and demand trading strategies. By identifying critical zones automatically, it offers a significant advantage in terms of accuracy and efficiency.However, like any tool, it works best when combined with proper price action analysis and risk management. Whether you’re a beginner or an advanced trader, this indicator is a valuable addition to your trading arsenal.


